How to Serve Multiple Domains with one AWS Load Balancer
Why just one Load Balancer? #
Recently, I was setting up some isolated services hosted separately from the main monolith server (you could call them “microservices”; they still need to be accessed independently from the internet though). The main API uses an AWS application load balancer to direct traffic to multiple EC2 instances (whose count increases and decreases automatically with demand). Even if the microservices will run on just one instance for now, it’s still very convenient to use a load balancer to direct traffic to them, since it can be configured to use SSL certificates and even automatically renew them very easily. In addition, when you need to scale to muliple instances, it’s extremely simple to do so.
However, as of this writing, one AWS application load balancer costs around $24 per month plus taxes (depending on the traffic and your AWS region), which is often more than the instance running the service itself. Thus, setting up a separate load balancer for every small service adds up quickly. So I was wondering whether an application load balancer could be configured to route traffic differently based on the domain and therefore be used for multiple domains. It turns out that this is possible, and it even supports smart selection of different SSL certificates for each domain.
1. Create a Load Balancer #
If you don’t already have one running, let’s first create a new load balancer. Otherwise, you can skip to step 2.
You can use CloudFormation templates and define it as “infrastructure as code”, however in this post I will just use the AWS console to set everything up.
Head over to the EC2 > Load Balancer section of the AWS console and click on “Create Load Balancer”. In the next step, select “Application Load Balancer” and give it a name of your choosing.
If you’re using it for publicly available web services, you should choose “internet-facing”. To be ready for IPv6, it’s also advisable to use “dualstack” (make sure your VPC’s subnets support IPv6 too, though,otherwise just choose IPv4 only) And as we will use SSL certicicates later, you can choose to listen only for HTTPS traffic (port 443):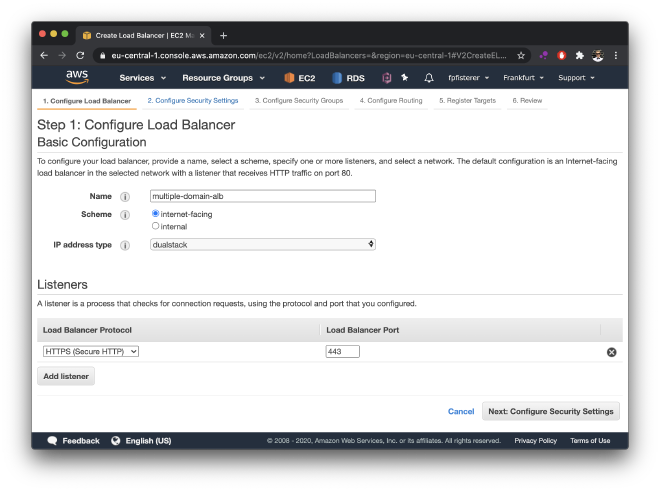
As it makes sense to make your instances only accessible from within the VPC (and from the public internet only via the load balancer), you need to put the load balancer in the same VPC as your instances in the next step. Select subnets from at least two availability zones.
If you have chosen to listen for HTTPS traffic, it will ask you to supply a certificate in the next step of the wizard, which you can either upload or import from ACM (which is what I recommend, as it is very convenient and quick to set up). Heading over to the certificate manager console, you can very easily request a public SSL certificate for your domain. This can be either one certificate per domain that you want to host with this load balancer, or alternatively you can also include multiple domains for your different services in one certificate. If you use Route53 as your DNS, ACM provides you with a simple button to set up the DNS records required to validate domain ownership, which you need to obtain the certificate. Otherwise, you need to set up the DNS records manually.
Once ACM has validated the DNS entry, you can select the certificate in the setup wizard of your load balancer. In the next step, you will be asked to choose a security group (a virtual firewall) for the load balancer. If you want to accept public HTTPS traffic, you need to allow incoming TCP traffic on port 443. If you want to forward the traffic to your instances, you should also allow outbound traffic to your VPC. It’s good practice to grant the least privilege, i.e., only allow traffic that you actually need.
In the next step, you configure a target group, which is a group of instances (or IP addresses, or AWS Lambdas) you want to direct traffic to.
In my example, I will choose to forward traffic as HTTP to some EC2 instances on port 80. Note that the target group we are setting up here is just for one of the services we are hosting with the load balancer.
This service will perform health checks on /v1/status: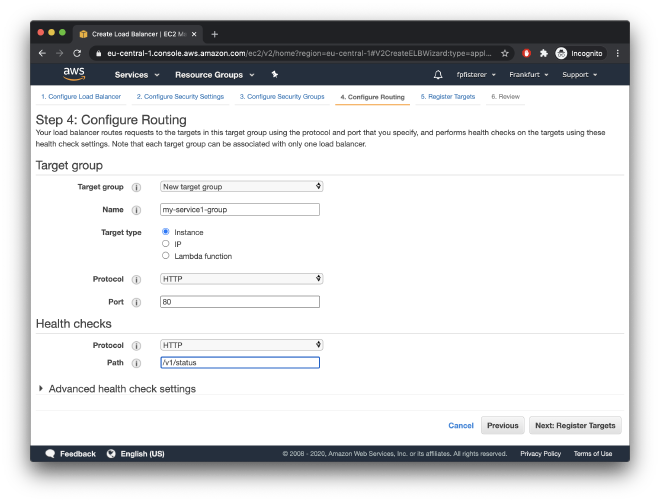
If you already have the instances running, you can register targets into your target group in the next step already. You can do this later too, though. On the final page, review all your settings and click “Create” to provision your load balancer.
2. Set up DNS Records #
If we want to serve multiple web services with different domains using one AWS application load balancer, we need to point the domains all to this load balancer. Again, if you’re using Route53 as your DNS, you can create a new “simple” record (selecting the load balancer as the target for the A/AAA record) for each domain you want to serve.
Otherwise, navigate to the EC2 > Load Balancer section of the console, find your load balancer, and look for the “DNS name” entry in the “Description” section. It will be something like
lb-name-1234567890.your-region.elb.amazonaws.com
Add this as a CNAME record in your DNS for the (sub-) domains you want to serve using the load balancer.
Now traffic from all of these domains is routed to the load balancer. What remains is create a target group for each domain, and then add rules in the load balancer that direct traffic to these groups based on the domain.
3. Create a Target Group for Each Service #
Head to the EC2 > Target Groups console and create a target group for each service (domain) you want to host with the load balancer. In the setup wizard, make sure to select the same VPC as the one that the instances are in which you want to add to the target group (otherwise you won’t be able to register the respective instances later).
4. Set up Routing Rules #
In the EC2 > Load Balancer console, find your load balancer, and navigate to the “Listeners” tab. You’ll find an HTTPS and/or HTTP listener there. In the “Rules” column, you’ll see that it already has a default rule to direct traffic to your main target group. We will now add additional rules to decide to which target group traffic should be directed. Click on “View/edit rules”. There you will see the existing default rule as the “catch-all”, which will direct any traffic to the default target group you have set up.
The following steps need to be done for each domain you want to serve using the load balancer.
To add a new rule, click the “+” button and then select “Insert rule” at the top.
Add an “IF” condition for the host reader to match the domain you want to use for the service. Click the checkmark and add the “THEN” action to forward traffic to the target group of that service (which you have created in step 3):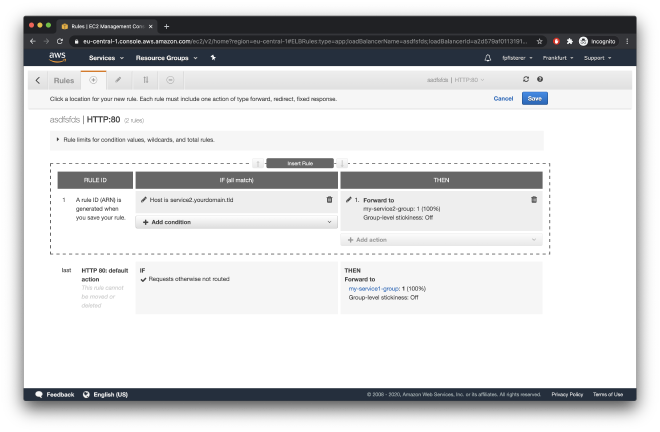
If you expect different services to receive different amounts of traffic, it’s smart to add the frequently used services first, as your load balancer bill depends in part on the number of rule evaluations. If the most frequent services are defined first, less rules are evaluated in total. (Note however that about $0.008 per hour get you 1000 rule evaluations per second, so will be only noticeable if you have a lot of traffic).
5. Add Additional SSL Certificates #
If you haven’t already done this in step 1, and you’re using an HTTPS listener, you might need to add additional SSL certificates for the additional domains that are routing traffic to your load balancer. Head again to the EC2 > Load Balancer console, find your load balancer, and navigate to the “Listeners” tab. For the HTTPS listener, click on “View/edit certificates”. To add an additional certificate other than the default certificate, click on the “+” button again, and either select a ceritficate from ACM or import your certificate. You can add upto 25 certificates, and you can use both one per domain or certificates issued for multiple domains.
The load balancer will smartly select the right certificate to use for each incoming request (depending on the domain).
If you need any help or consulting for your cloud architecture or backend project, feel free to reach out!