Set Up a Redis Instance with RedisGraph on AWS
Why not use a managed solution? #
RedisGraph is a Redis module for working with graphs. Nodes and edges can have labels and any number of properties, and you can query the graph very fast, using the Cypher Query Language.
I was using RedisGraph in a recent project and was looking for a managed solution like AWS’s ElastiCache to host my instance. However, as RedisGraph is distributed under another license than Redis itself, cloud providers like AWS are not selling managed Redis instances that run RedisGraph (which is more thoroughly explained in this GitHub issue). The only managed solution comes from Redis Cloud Pro, which seems to be for large enterprise projects only (and starts at multiple hundred $s per month).
Thus, I ended up creating my own “managed” Redis instance running RedisGraph on an EC2 instance. Which, as a side benefit, is much cheaper to run than a managed ElastiCache instance ($18/month vs. $30/month for approx. 1.6 GB of RAM as of Nov. 2020).
The Goal #
I wanted the solution to be as simple as a managed service. While managed hosting certainly includes other features like monitoring, for me the important points were:
- I can create additional instances (with potentially different hardware specs) very easily
- The instance is set up exactly as I want it automatically, without me having to manually do anything (just press a button)
- When I reboot the instance, Redis should start and load RedisGraph automatically
- Redis should periodically persist its data to disk and automatically load it when it starts again after a reboot or manual restart
So I decided to create an EC2 launch template that, when a new instance is created from it, automatically installs Redis, pulls the latest RedisGraph version, builds it locally, configures everything as I want it and starts Redis right away and again at reboot.
The Launch Template #
You can use the AWS CLI too, but for things like a one-time set up of a launch template, I prefer the console.
So, navigate to EC2 -> Instances -> Launch Templates in the AWS console and click “Create launch template”. Fill in a name and description. For the AMI (Amazon Machine Image, basically the OS and some pre-installed software), I chose Ubuntu Server 20.04 LTS.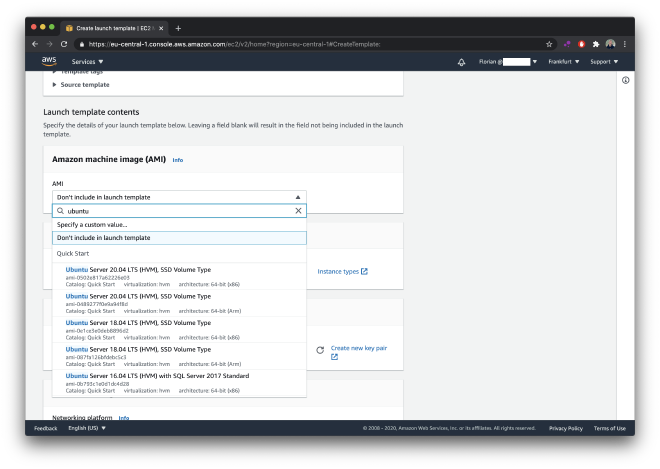
I chose not to specify the instance type in the template, since I wanted to be able to deploy different instance types with the same template easily.
In the “Network settings” section, make sure to add a security group that grants access on 6379 (which is the default port for Redis) to (only) the instances or subnets that need to access the Redis instance. As for storage, the default 8 GB should be enough (unless if you’re deploying a huge multiple-GB Redis database, you should have at least as much storage as RAM for the Redis persistence backup).
In the “Advanced details” section, I added the following user data script, which takes care of everything listed above:
#!/bin/bash

# 1. install redis-server
sudo apt update -y
sudo apt install redis-server -y

# 2. clone and build the latest RedisGraph
# release (see the instructions on their GitHub repo)
sudo apt-get install build-essential libtool -y
sudo apt-get install m4 automake peg cmake autoconf -y

cd /home/ubuntu
git clone --recurse-submodules -j8 \
    https://github.com/RedisGraph/RedisGraph.git

# result will be in
# /home/ubuntu/RedisGraph/src/redisgraph.so
cd RedisGraph
make

# move to /var/redis
sudo mkdir -p /var/redis
sudo cp /home/ubuntu/RedisGraph/src/redisgraph.so \
    /var/redis/redisgraph.so

# cleanup
sudo rm -rf /home/ubuntu/RedisGraph

# 3. configure redis-server
# in the /etc/redis/redis.conf file
# (adjust the settings to your needs here)
echo "# modules
loadmodule /var/redis/redisgraph.so

# security
requirepass your-secret-password
protected-mode yes
bind 127.0.0.1 ::1

port 6379

tcp-backlog 511
timeout 0
tcp-keepalive 300

# running env (important)
daemonize yes
supervised systemd

# general
pidfile /var/run/redis/redis-server.pid
loglevel notice
logfile /var/log/redis/redis-server.log
databases 16

# snapshots
save 900 1
save 300 10
save 60 10000

stop-writes-on-bgsave-error yes
rdbcompression yes
rdbchecksum yes
dbfilename dump.rdb
dir /var/lib/redis

appendonly no
appendfsync everysec
no-appendfsync-on-rewrite no
auto-aof-rewrite-percentage 100
auto-aof-rewrite-min-size 64mb
aof-load-truncated yes
aof-use-rdb-preamble yes

# replication
replica-serve-stale-data yes
replica-read-only yes
repl-diskless-sync no
repl-diskless-sync-delay 5
repl-disable-tcp-nodelay no
replica-priority 100

# memory (adjust to your needs)
maxmemory 1G
maxmemory-policy noeviction

lazyfree-lazy-eviction no
lazyfree-lazy-expire no
lazyfree-lazy-server-del no
replica-lazy-flush no

# other
lua-time-limit 5000
slowlog-log-slower-than 10000
slowlog-max-len 128
latency-monitor-threshold 0
" > /etc/redis/redis.conf

# 4. start daemonized redis-server
# with start on boot
sudo service redis-server restart
sudo systemctl redis-server enable
For your convenience, I put the user data script in a GitHub Gist, too.
Conclusion #
When I now want to set up a RedisGraph instance, I simply create a new instance from my launch template.
When the instance reboots, it automatically restarts Redis and loads the dump.rdb file (i.e., restores the contents of the database).
In order to get to a fully managed experience, there’s a lot more work to be done. This includes adding detailed monitoring, downtime notifications, automatic software updates, … and all the other convenience you get from managed hosting. Thus, for simple Redis hosting, I would pay the premium and use ElastiCache (or any other cloud provider’s service).
However, since RedisGraph is not available there, and for the fun of it, for my use case it made sense to create this launch template.
If you need any help or consulting for your cloud architecture or backend project, feel free to reach out!